SalesForce Integration

LiveAdmins can be integrated into Salesforce CRM with relative ease. It also offers two different ways to integrate. You’re free to use whichever way is most convenient for you.
Methods:
- Web-to-lead
- SOAP API
Web-to-lead
STEP 1:
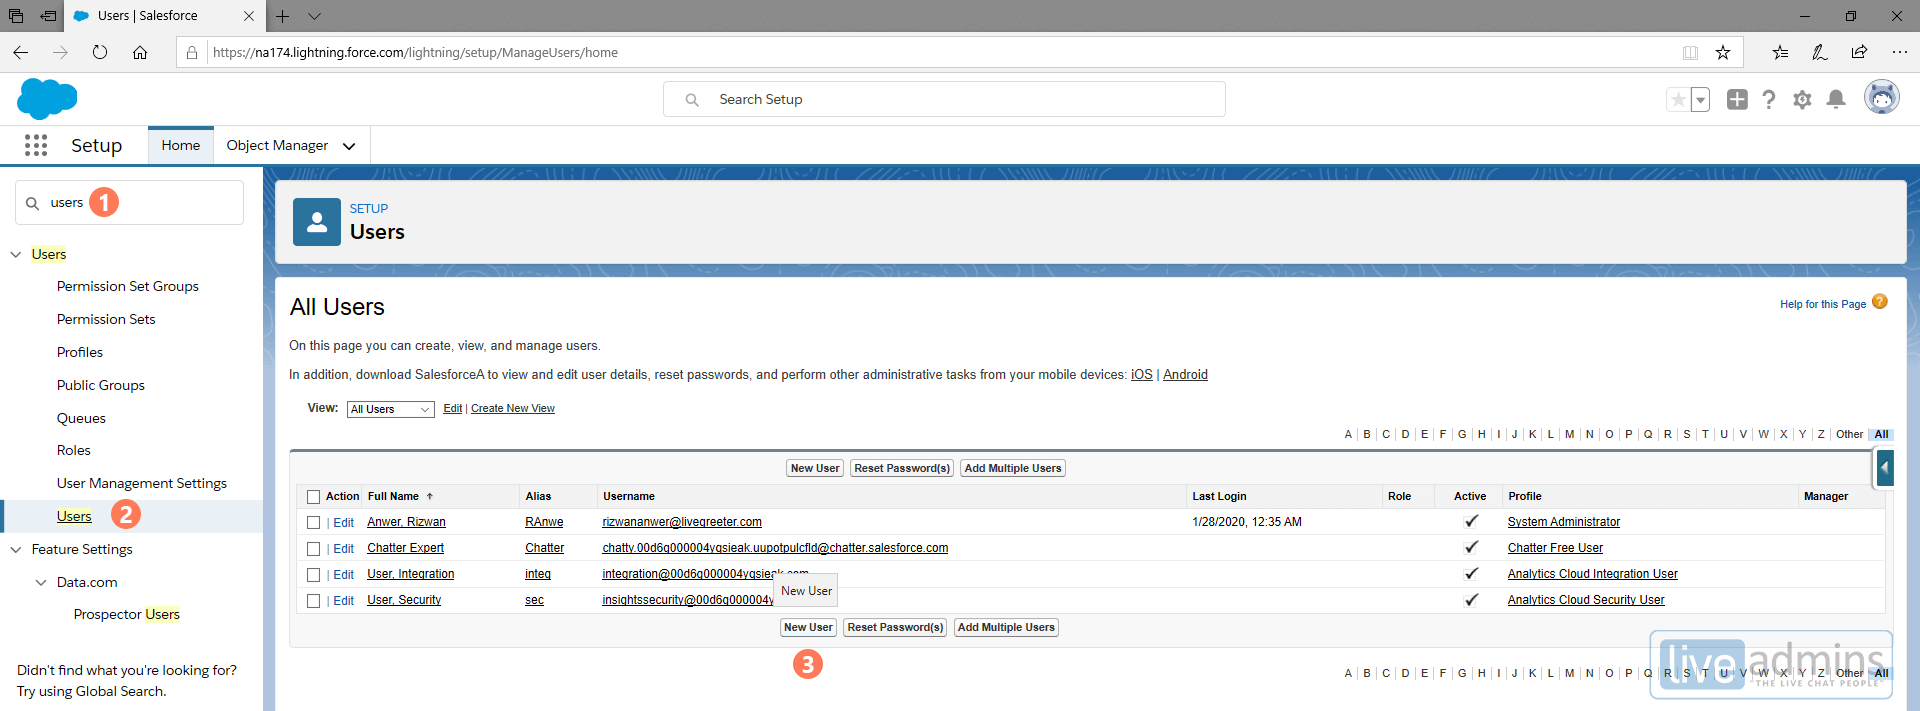
Login to your Salesforce account, at the top right, click Setup (gear icon) next to the Notifications (bell icon). Click on the setup option in the dropdown box. This is visible as (1) on Figure 1.
STEP 2:
A new tab will open, it will take you to setup home. On the left side of the screen will be a search box named Quick Find. Here, search for the term ‘web-to-lead’. Click on the Web-to-lead link as shown in (2) & (3) in Figure 1.
STEP 3:
A setup page will open, click on the ‘Create Web-to-Lead Form button’ as shown in (4) in Figure 1.
STEP 4:
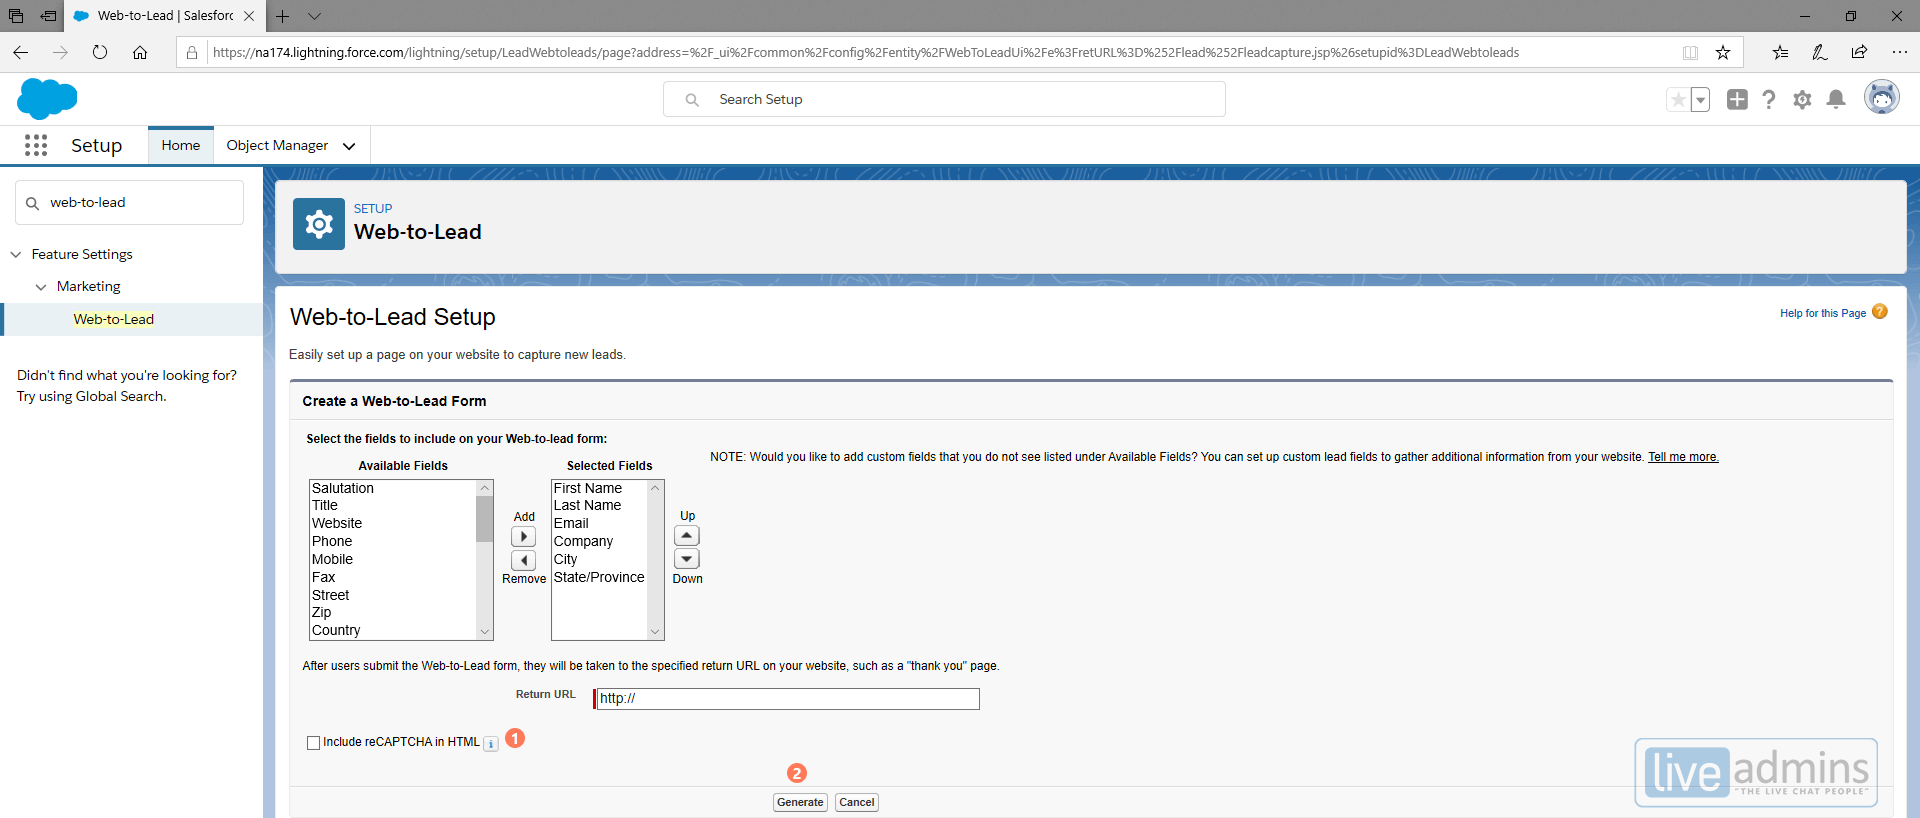
Based on the required fields for your purposes, choose and select fields from the ‘Available fields’ and move them using the ‘Add’ arrow in the middle to the left ‘Selected Fields’ box.
STEP 5:
Leave Return URL as it is. Don’t enter any input in the box.
STEP 6:
Uncheck the ‘include reCAPTCHA in HTML’ checkbox. Shown as (1) in Figure 2.
STEP 7:
Once you have satisfied your requirements in step 4, click the ‘Generate’ button to proceed. Shown as (2) in Figure 2.
STEP 8:
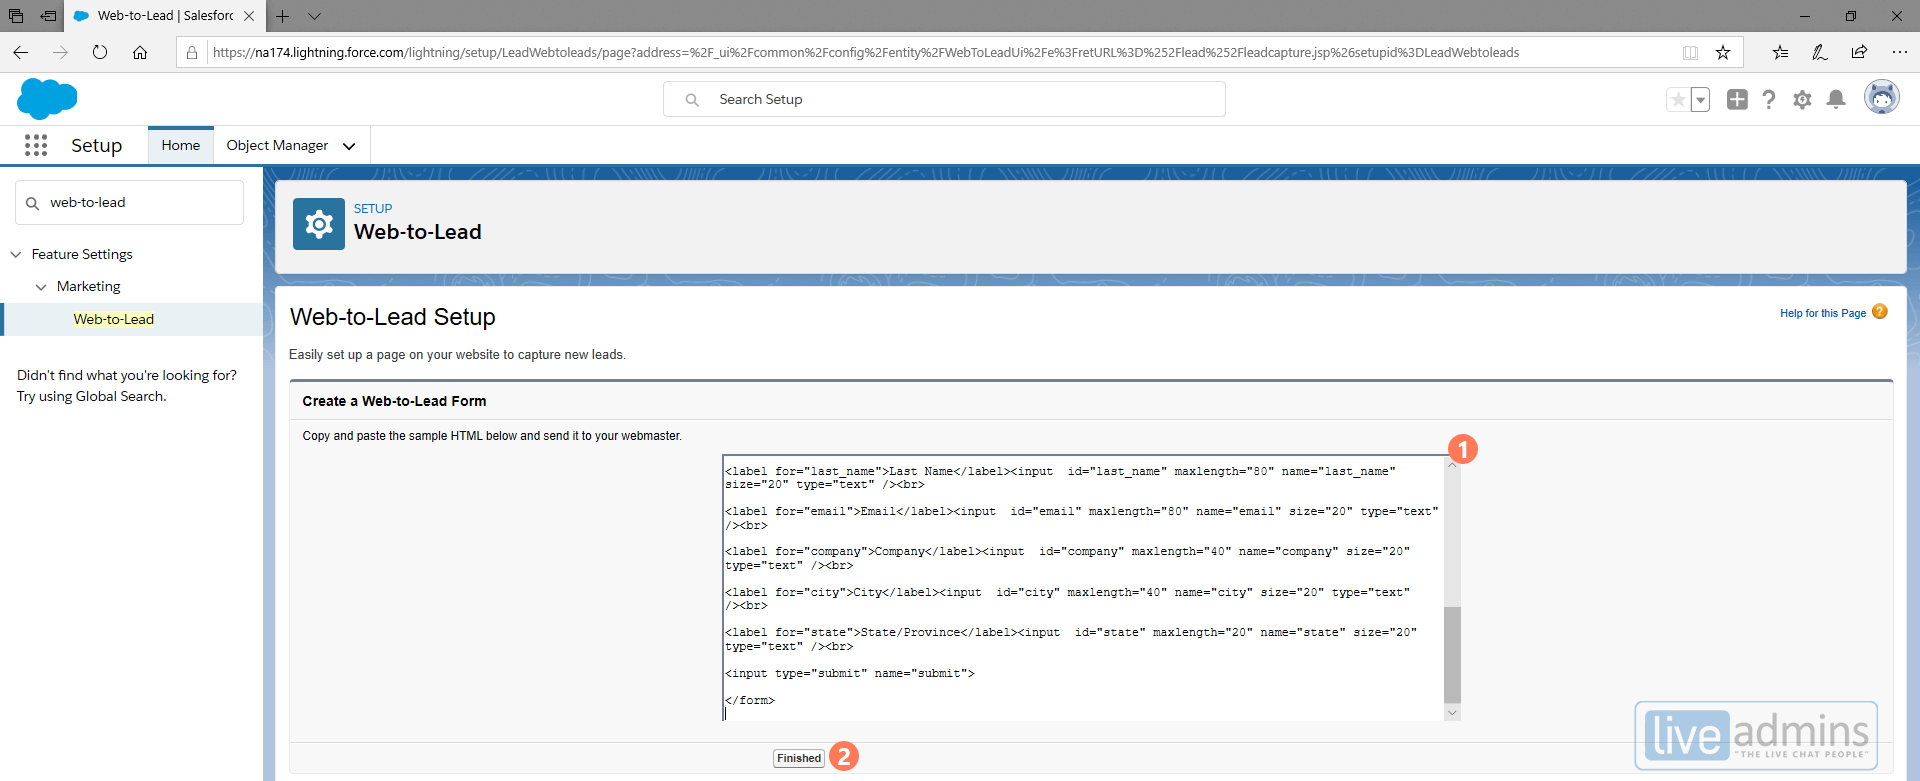
Copy and paste the text in the text box. Shown as (1) in Figure 3 using (CTRL + A, followed by CTRL + C and CTRL + V) and share it with us via email. When done, close the box by pressing Finished, shown as (2) in Figure 3.
SOAP API
Generating User
STEP 1:
Generate a new username and password to share with us. This is an option if you don’t wish to share existing credentials of your user accounts.
STEP 2:
Login to your Salesforce account, at the top right, click on the Setup (Gear icon) next to Notifications (bell icon). Click on the setup option in the dropdown box. A new tab will open and will take you to setup home.
STEP 3:
On the left side of the screen will be a search box named Quick Find. Here, search for the term ‘Users’ shown as (1) in Figure 1. Click on Users under Users. Shown as (2) in Figure 1.
STEP 4:
A new page will open by the name of ‘users’, click on the ‘New User’ button. Shown as (3) in Figure 1
Set up all the necessary credentials and valid user details for the account.
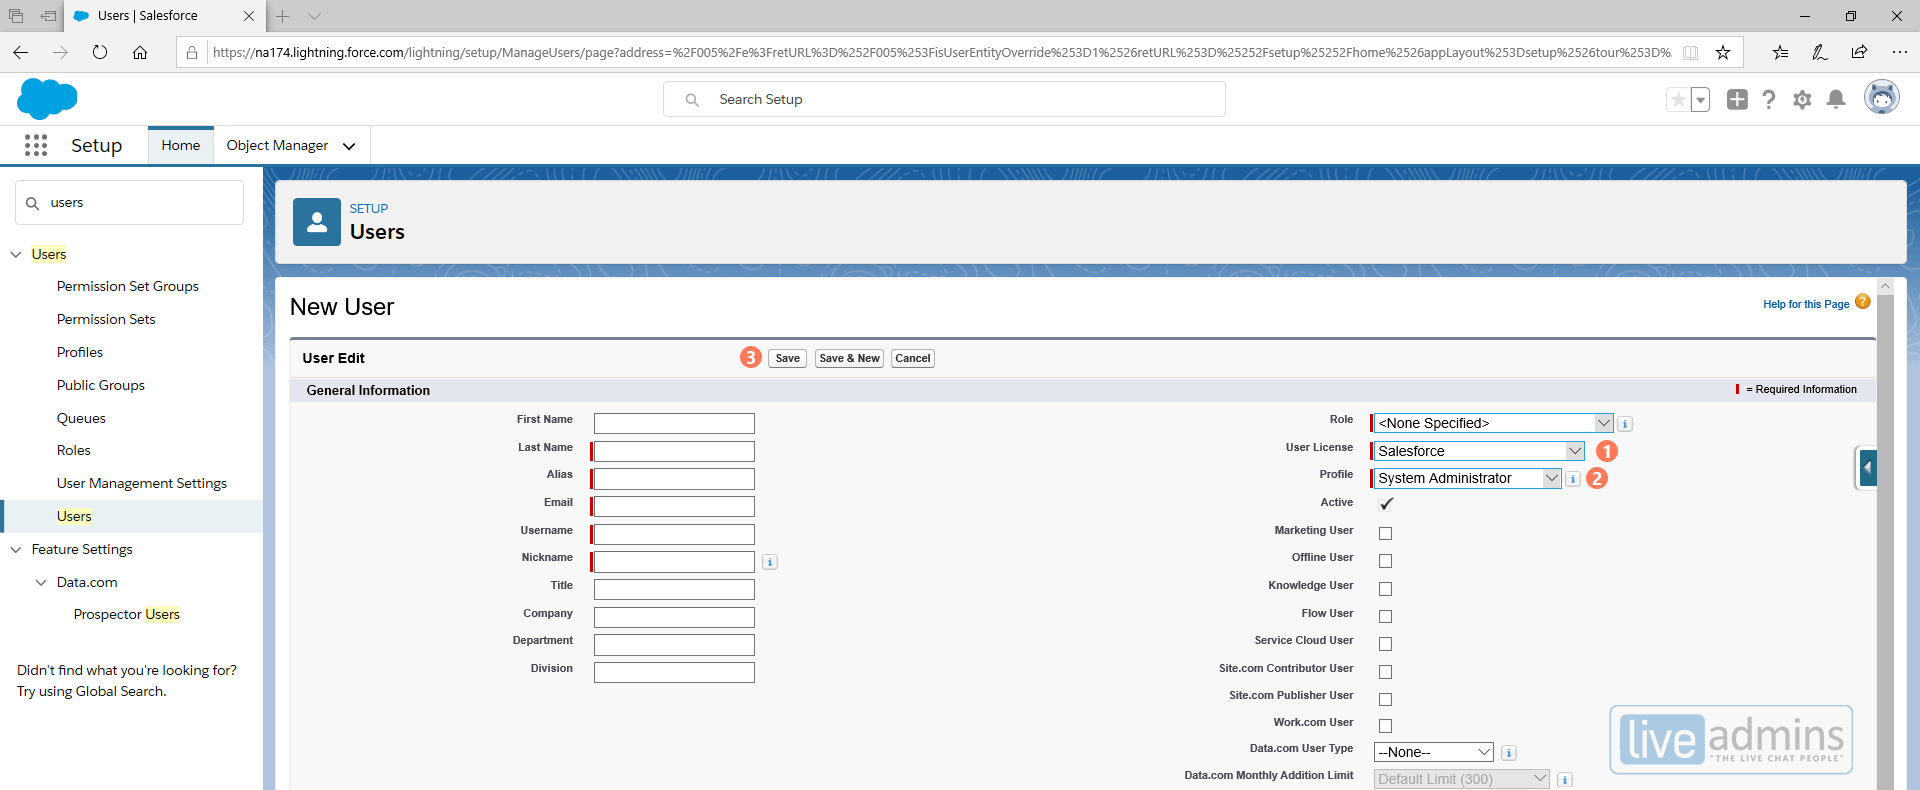
Set User License to ‘Salesforce’ from the dropdown box. Set Profile to ‘System Administrator’ from the dropdown box. Shown as (1) and (2) in Figure 2.
Once you have done all the above, click on ‘Save’. Shown as (3) in Figure 2.
Generating Security token
NOTE: For the next step, ensure you are logged in Salesforce with the same account that you’ve made in the previous step. If you already have a token, you can skip this step. If you don’t have a token, then generate a security token for the newly-created account with these steps.
STEP 1:
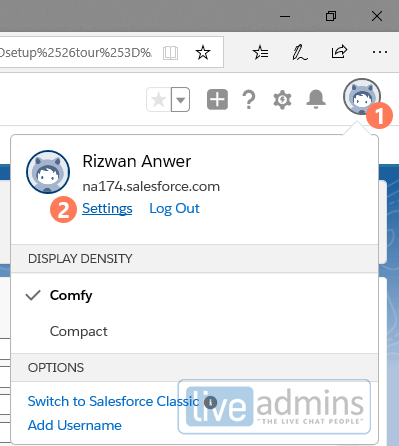
Now we need to generate a ‘Security Token’. Login to your Salesforce account, at the top right, click on ‘View Profile’, under the username and CRM web address, click on ’Settings’. Shown as (1) and (2) in Figure 1.
STEP 2:
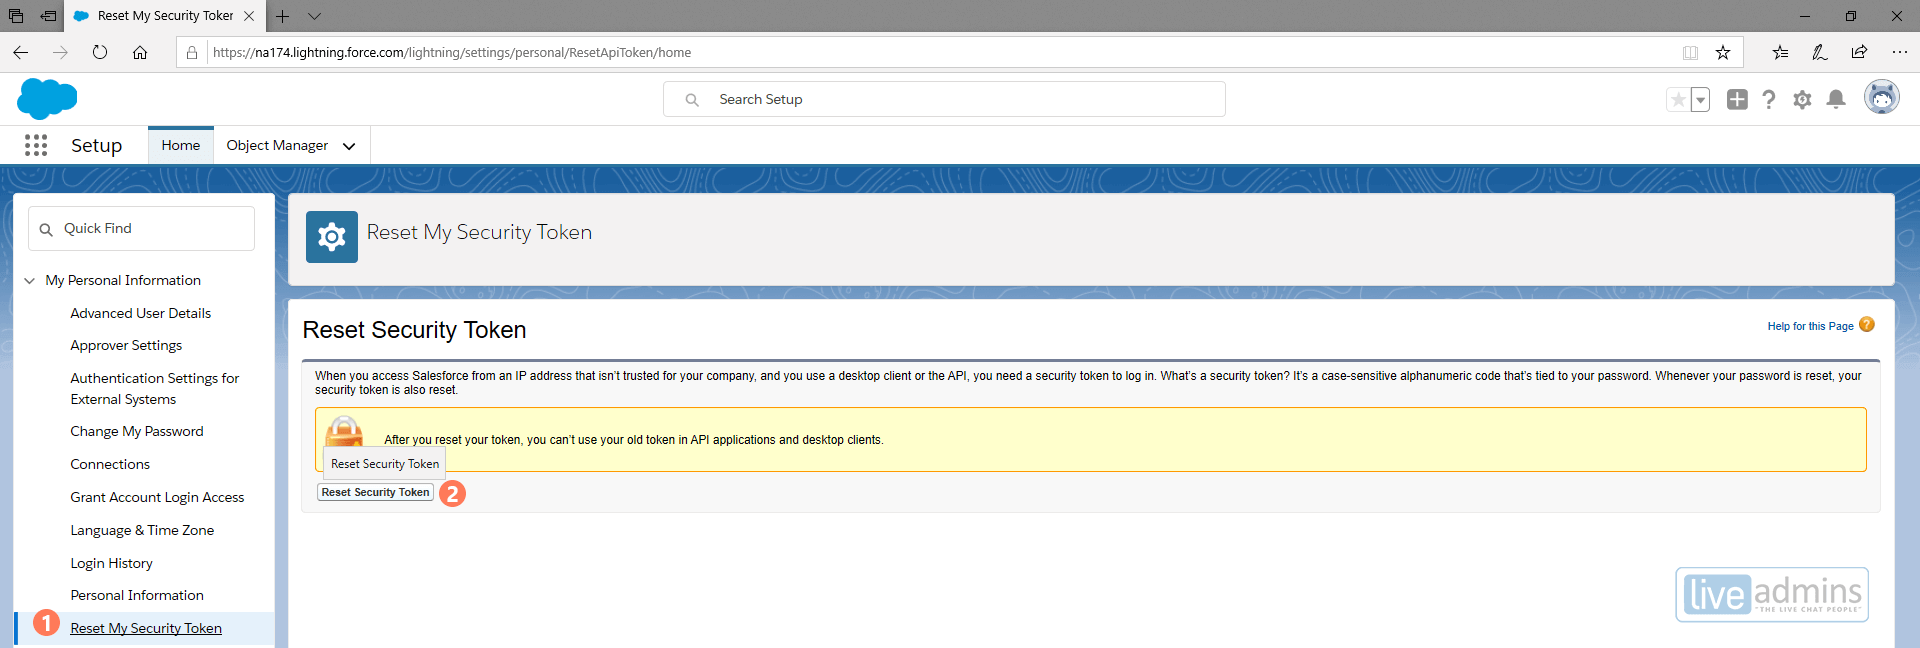
On the left side of the screen will be a search box named Quick Find. In here, search for the term ‘Security Token’. Click on ‘Reset My Security Token’ under My Personal Information. Shown as (1) in Figure 2.
STEP 3:
Click on the ‘Reset Security Token’ button. Shown as (2) in Figure 2.
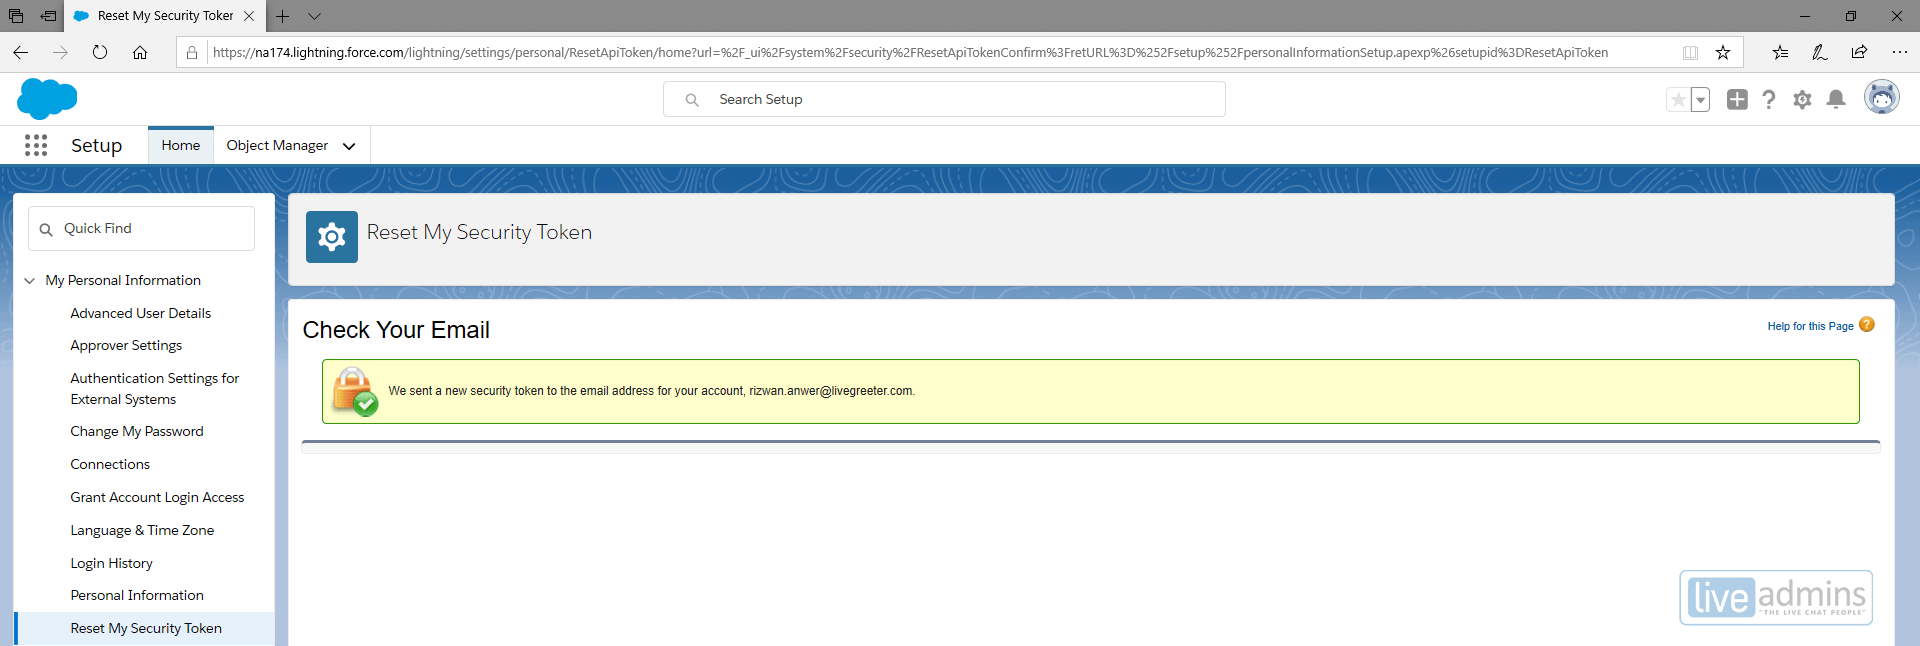
STEP 4:
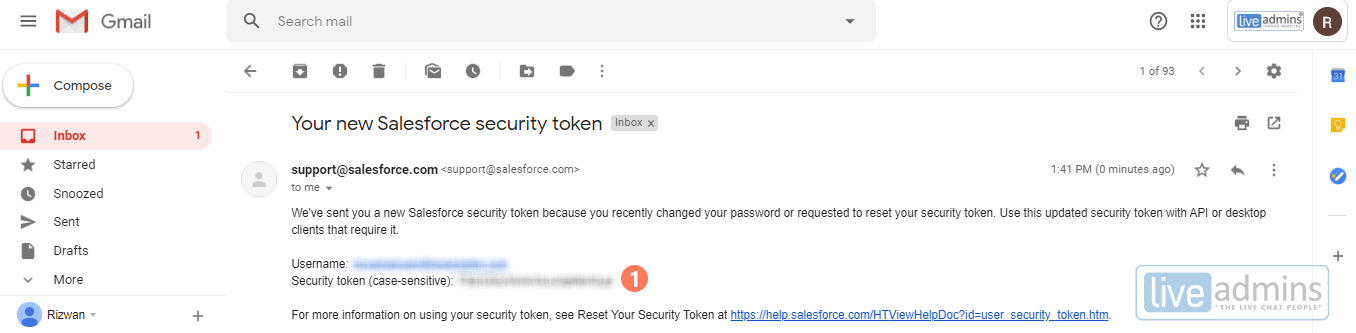
Once you have reset the token, login to the email address related to that account, and look for an email with the subject ‘Your new Salesforce security token’.
In the email body, copy and paste the Security token as it is with us via email. Shown as (1) in Figure 3.
We are now going to create an enterprise WSDL. This is needed for SOAP API integration.
Generating enterprise WSDL
STEP 1:
Login to your Salesforce account, at the top right, click on the Setup (Gear icon) next to Notifications (bell icon). Click on the setup in the dropdown box. A new tab will open, it will take you to setup home.
STEP 2:
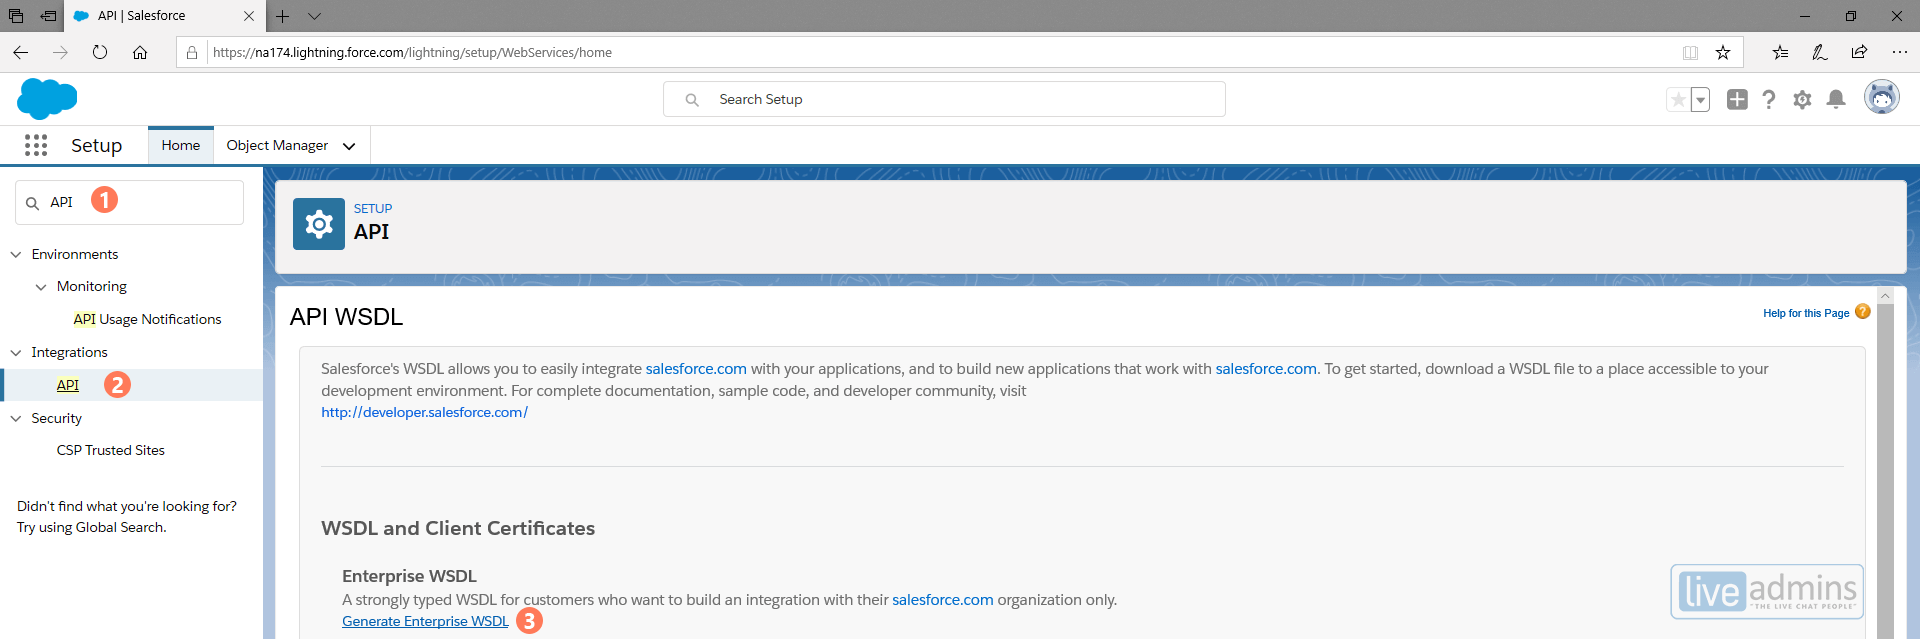
On the left side of the screen will be a search box named Quick Find. Here, search for the term ‘API’. Click on API under Integrations. Shown as (1) and (2) in Figure 1.
STEP 3:
A new screen will open by the name of API. Look for Enterprise WSDL in bold, below WSDL and Client Certificates, and click on the ‘Generate Enterprise WSDL’ hyperlink. Shown as (3) in Figure 1.
STEP 4:
A new XML page will open, once it’s fully loaded, right-click on the page and choose ‘Save as …’ Save the file as ‘wsdl.xml’ (case sensitive) on your system (desktop, local drive, etc). Share this generated file with us via email.
You can do the above by using CTRL+A, and then CTRL+C & CTRL+V in Notepad. Then press CTRL+S and in Save as type, make sure you select All Files.
Sharing CRM fields to populate
Step 1:
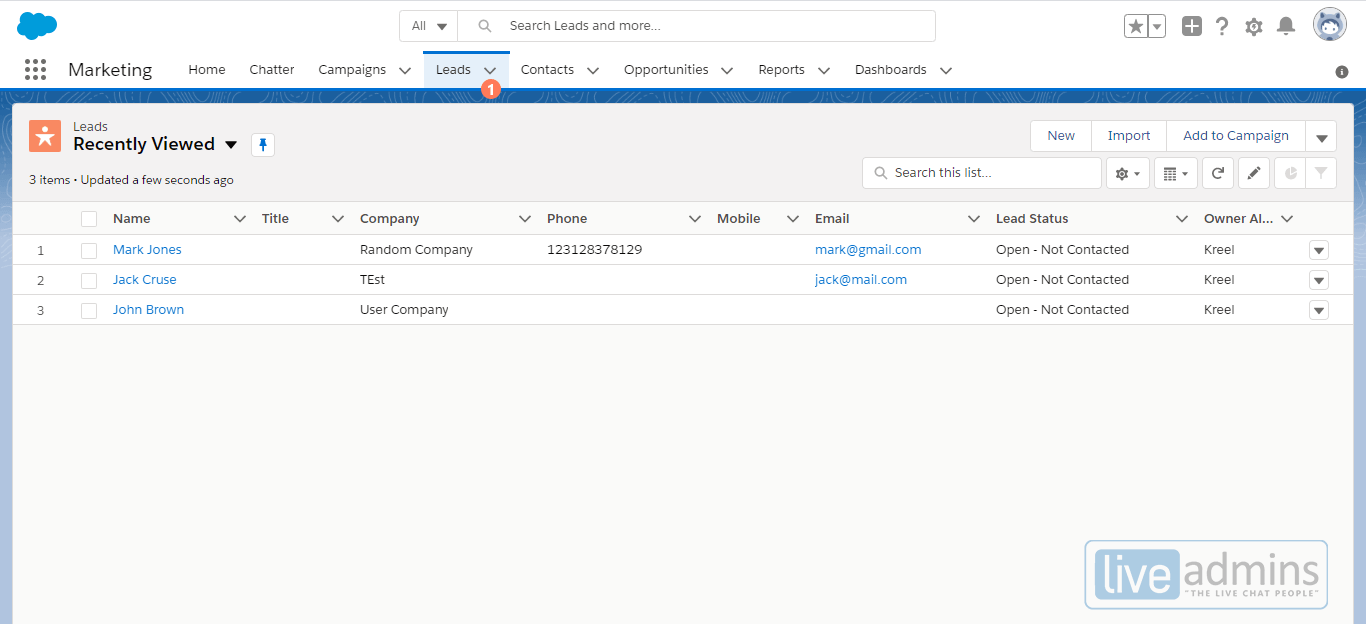
On the Salesforce homepage, go to the ‘Leads’ tab and open a lead. Shown as (1) in Figure 1.
Step 2:
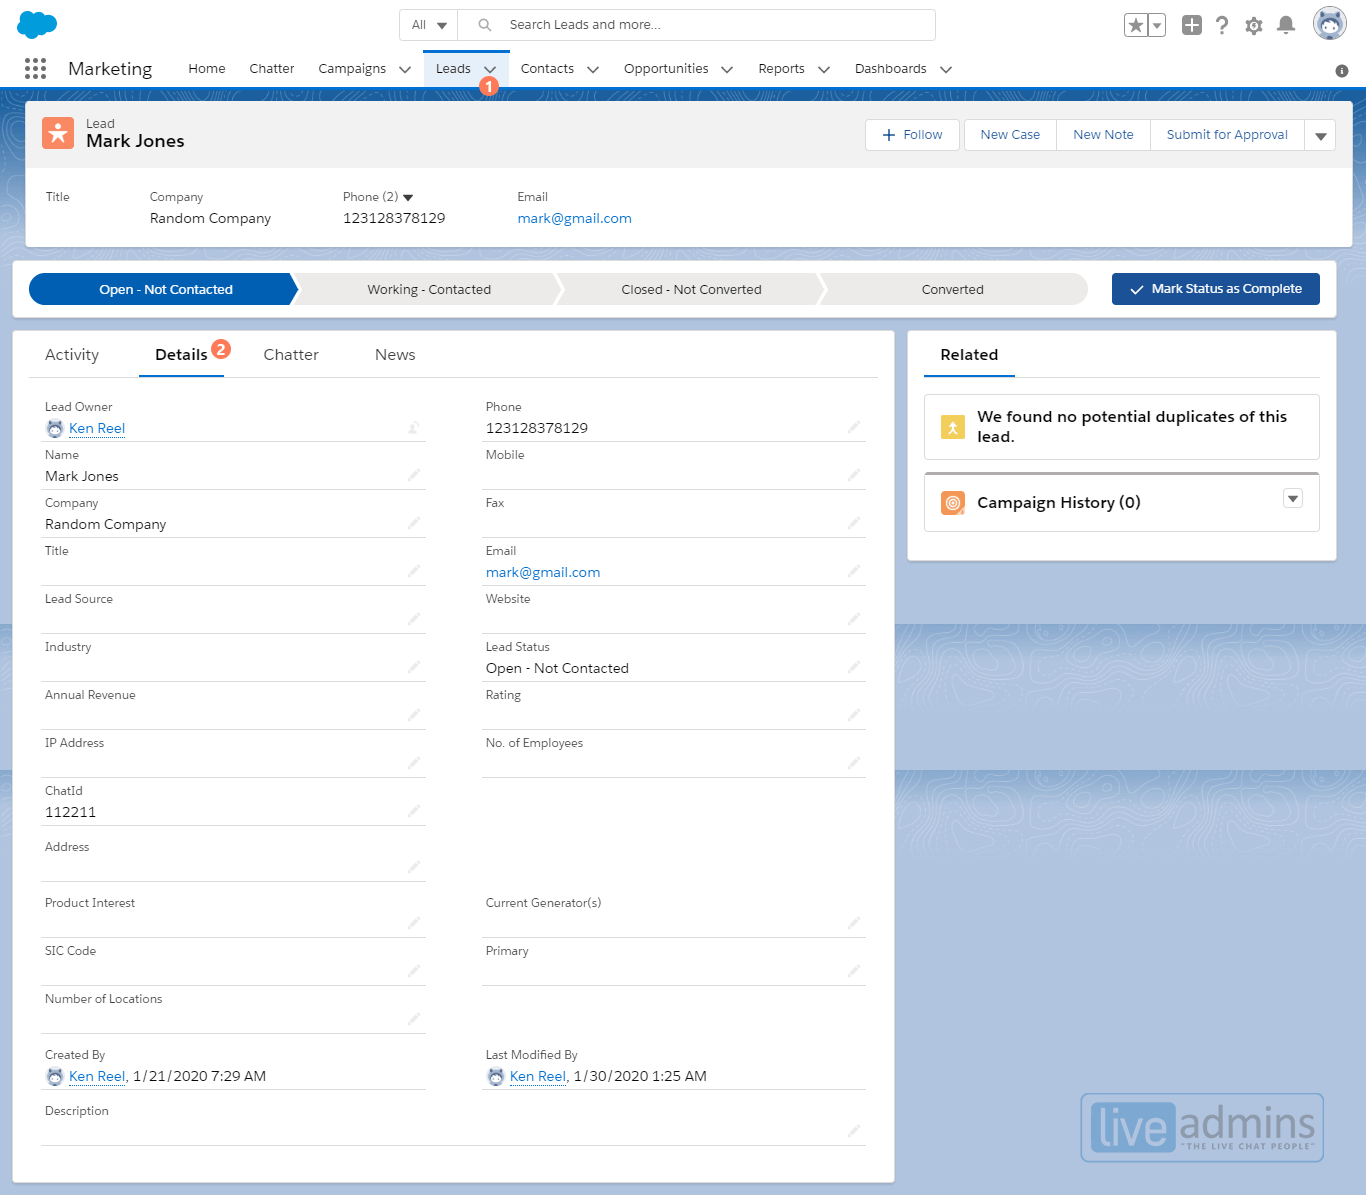
Click on the ‘Details’ tab and you will see all the lead fields here (Name, company, title, etc.). Shown as (1) and (2) in Figure 2.
From here, share the fields you want to populate with us via email.