Zoho CRM Integration

Follow these steps to integrate LiveAdmins Live Chat with Zoho CRM
Step 1:
Open https://crm.zoho.com/crm/ on your browser, and login with your credentials.

Step 2:
Click on the Setup button at the top-right corner (Gear icon).
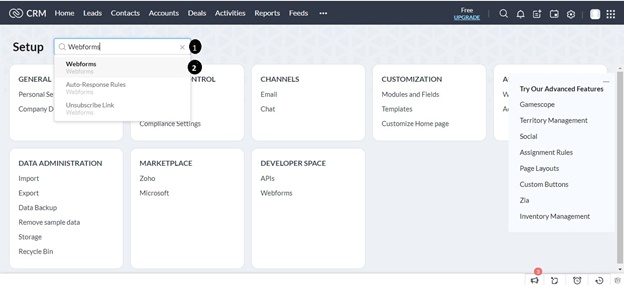
A new page titled Setup will open up. In the search box in the center, search for the term Webforms, and click on it when the result appears. Shown as (1) and (2) in Figure 2.

Figure 2

Step 3:
A new page will open up, press the New Form button at the center of the screen. Shown as (1) in Figure 3.

A new dialog box will open, enter the Form Name as you see fit, and in the Module, set it to Leads. Click on Create when done. Shown as (1) and (2) in Figure 4.

Step 4:
A drag and drop screen will open. You can now freely move fields from the left field to the center form. Once you have made the form per your requirements, press the Next button at the top-right corner. Shown as (1) in Figure 5.
Note: Do not drag and drop any of the Advanced fields into the form.

Step 5:
A new dialog box will open on the screen. In the Form Location URL, enter * (asterisk alone). In the Landing page URL enter your company’s website, including https://. Shown as (1) and (2) in Figure 6.
Once you have done the above, click on Save. Shown as (3) in Figure 6.

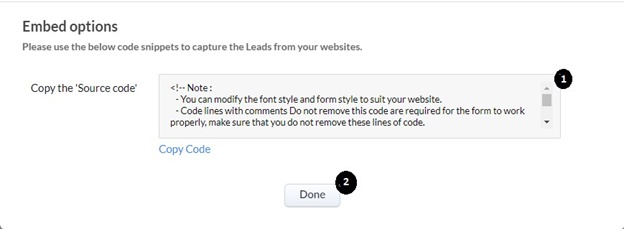
Figure 7
Step 6:
Copy and paste the code in Your Webform Source Code into a text file (notepad, doc, etc.) and share it with us via email. Shown as (1) in Figure 7.
Once you click on Done, a new Webform will be created, make sure you don’t delete it. Shown as (2) in Figure 7.

